

PERMEABLE PAVERS
Permeable Pavers: Can Natural Stone Truly Be Classified as One?
Permeable Pavers: Can Natural Stone Truly Be Classified as One?
Permeable pavers represent a sustainable approach to paving, designed to combat the issues associated with traditional impervious surfaces. A permeable paver is a type of paving surface specifically engineered to allow water to filter through its surface and into the ground below, rather than becoming runoff that enters storm drains or pools on the surface. This crucial function is achieved in one of two ways:
- Porous Materials: The paver itself is manufactured from a material with inherent voids or open pores that allow water to pass directly through it. Examples include permeable concrete and porous asphalt.
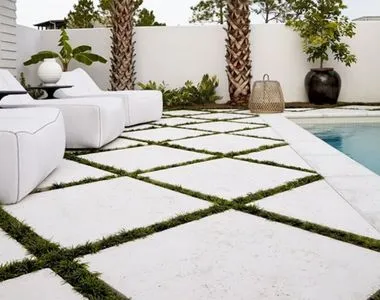
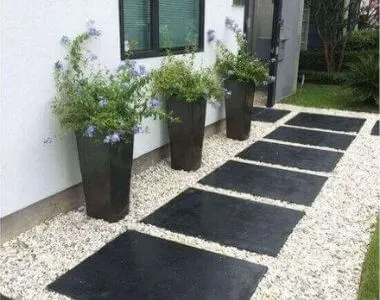
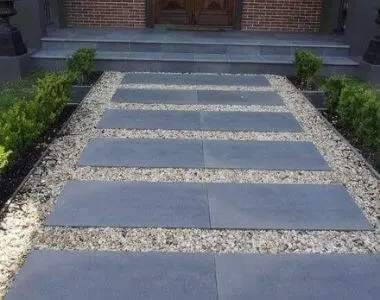
- Gaps between Non-Porous Blocks: Non-porous paving blocks are laid with intentionally wider joints, which are then filled with permeable materials such as open-graded aggregates or specialised permeable jointing compounds. These gaps facilitate the flow of water between the individual paving units.
The overarching goal of permeable paving is multifaceted: to effectively manage stormwater runoff, reduce urban flooding, replenish groundwater reserves, filter out pollutants before they reach waterways, and even mitigate the urban heat island effect by allowing water to evaporate and cool the surface.
Natural Stone Pavers: Porous, but Not Inherently Permeable
While natural stone pavers, such as granite, bluestone, sandstone, or travertine, are indeed porous – meaning they possess small internal openings that can absorb water – they are not automatically classified as “permeable pavers” in the comprehensive sense of a complete permeable paving system.
Here’s a breakdown of why this distinction is vital:
- A System, Not Just a Material: True permeable paving is fundamentally a system. It relies not solely on the material of the paver but on a meticulously engineered layered structure. This system includes a specially designed, deep base layer (typically comprising open-graded gravel or aggregate) and permeable jointing material, all working in concert to ensure efficient water infiltration and drainage into the underlying subsoil.
- Rate of Infiltration: The inherent porosity of natural stone allows some water to seep in, but it generally doesn’t provide the rapid and significant infiltration rates necessary for effective stormwater management on a larger scale. The key function of a permeable paving system is to handle substantial volumes of water efficiently.
- Installation Matters Significantly: For natural stone to function as part of a permeable paving system, its installation is paramount. It absolutely must be laid on a permeable base with wide, permeable joints specifically designed to facilitate water passage. If natural stone is installed on an impermeable concrete slab with traditional sand-filled joints, it will not operate as a permeable paver system, regardless of the stone’s individual porosity.
In essence, while natural stone pavers are porous, they are considered a “permeable paver” only when they are fully integrated into a larger, purpose-built permeable paving system that actively promotes substantial water infiltration into the ground.
Achieving a Permeable Paving System with Natural Stone Pavers
To effectively use natural stone pavers as an integral component of a permeable paving system, the entire paving structure must be designed and installed to facilitate water infiltration, extending far beyond the stone’s inherent characteristics. This involves a carefully constructed series of layers.
Key Components of a Permeable Paving System with Natural Stone:
Natural Stone Pavers:
- Type: A wide variety of natural stones can be used, including granite, bluestone, sandstone, basalt, or travertine. Their primary role in this system is their aesthetic appeal and structural durability.
- Spacing: Critically, these pavers are laid with wider joints than traditional paving (typically 5mm to 20mm or more, depending on the specific stone and desired aesthetic). These wider gaps are essential to accommodate the permeable jointing material.
Permeable Jointing Material:
- This is one of the most vital elements for water passage. Instead of conventional sand or mortar, permeable aggregates are used.
- Materials: Typically, fine, angular crushed aggregate (e.g., 2-5mm or 3-6mm clean gravel, often referred to as “grit” or “permeable aggregate”) is employed. The term “clean” is crucial, meaning it’s free of fine particles like clay or silt that could clog the system.
- Function: This material fills the gaps between the pavers, allowing water to flow directly through to the underlying layers.
Bedding Layer (Open-Graded Aggregate):
- This layer is situated directly beneath the pavers and their permeable jointing material.
- Material: It generally consists of a 25-50mm thick layer of open-graded aggregate (e.g., 5-10mm or 10-20mm clean crushed rock). “Open-graded” ensures there are minimal fine particles, creating significant void space for water storage and movement.
- Function: It provides a stable and level base for the pavers while simultaneously allowing water to pass through rapidly.
Base and Sub-Base Layers (Reservoir and Infiltration Beds):
- These layers form the primary water storage and infiltration components of the system. Their thickness is determined by factors such as anticipated rainfall, existing soil type, and required water storage capacity.
- Material: These layers are composed of larger, open-graded crushed rock (e.g., 20-40mm or 40-70mm clean crushed rock). The “clean” aspect is again vital for maintaining permeability.
- Function: These layers act as a temporary reservoir, holding stormwater and gradually allowing it to infiltrate into the underlying natural subgrade. They also provide essential structural support for the paved surface.
Geotextile Fabric (Optional but Recommended):
- A non-woven geotextile fabric is often placed between the subgrade and the base layers, and sometimes between the base layers themselves.
- Purpose: This fabric acts as a separator, preventing the natural subsoil from migrating upwards and mixing with the aggregate layers (which could lead to clogging), while still permitting water to pass through.
- A non-woven geotextile fabric is often placed between the subgrade and the base layers, and sometimes between the base layers themselves.
Subgrade (Native Soil):
- This refers to the natural soil beneath the entire paved area.
- Preparation: It is crucial that the subgrade is not over-compacted, as excessive compaction would impede water infiltration. If the natural soil exhibits very low permeability (e.g., heavy clay, common in areas like Kew, Victoria), additional measures such as underdrains or soil amendments might be necessary, or the system might primarily function as a detention basin with a slower release of water.
Edge Restraints:
- These are essential for containing the pavers and the permeable jointing material, particularly given the wider joints. Suitable materials include concrete haunches, steel edging, or other robust options.
Installation Steps to Achieve Permeability:
Site Preparation:
- Excavation: Excavate the area to the precise depth required, accounting for the thickness of all planned layers (paver + bedding + base/sub-base). This depth can vary significantly based on design needs, ranging from approximately 300mm to over 1 meter for substantial projects.
- Subgrade Assessment: It is critical to assess the infiltration rate of the natural subgrade. If it’s very slow-draining, consult an engineer for potential solutions, such as incorporating perforated pipes for faster drainage or designing the system to allow for longer water detention. Avoid over-compacting the subgrade.
- Slope (Optional): While the system is designed for infiltration, a very slight slope (e.g., 0.5-1%) can be incorporated into the subgrade and base layers. This can help direct any excess water towards a designated overflow point or an underdrain if the system reaches its maximum capacity.
- Excavation: Excavate the area to the precise depth required, accounting for the thickness of all planned layers (paver + bedding + base/sub-base). This depth can vary significantly based on design needs, ranging from approximately 300mm to over 1 meter for substantial projects.
Install Geotextile Fabric (if used):
- Lay the non-woven geotextile fabric over the prepared subgrade, ensuring all seams have adequate overlaps (at least 300mm).
Install Base and Sub-Base Layers:
- Begin by placing the coarsest open-graded aggregate for the sub-base layer, spreading it evenly to the specified thickness.
- Compaction: Lightly compact each layer using a vibratory plate compactor. It is crucial to avoid excessive compaction, as this can crush the aggregates and diminish permeability. The aim is to interlock the aggregates for stability, not to create an impermeable layer.
- Repeat this process for the subsequent base layer, using the next size of open-graded aggregate.
Install Bedding Layer:
- Spread the finer open-graded aggregate for the bedding layer uniformly over the compacted base.
- Screeding: Utilize screed rails to achieve a perfectly uniform thickness and a level surface for laying the natural stone pavers.
Install Edge Restraints:
- Install the chosen edge restraints around the perimeter before laying the pavers. These are vital for preventing the lateral movement of the entire system’s components.
Lay Natural Stone Pavers:
- Carefully place the natural stone pavers onto the screeded bedding layer, ensuring the specified wider joint spacing is consistently maintained. Spacers can be used to achieve uniform gaps.
- Ensure joint alignment is as per your design (e.g., running bond, stack bond, or an irregular pattern).
Fill Joints with Permeable Jointing Material:
- Once all pavers are laid, sweep the permeable jointing aggregate (e.g., 2-5mm grit) over the entire paved surface.
- Use a broom or a plate compactor (equipped with a protective mat) to vibrate the aggregate into the joints until they are completely filled.
- Repeat this process until the joints remain full.
- Critical Note: Do not use traditional polymer sand or polymeric jointing sand, as these products are designed to harden and become impermeable, directly contradicting the purpose of a permeable system.
Final Compaction:
- After the joints are filled, run a plate compactor over the entire paved surface. This helps to firmly settle the natural stone pavers into the bedding layer and locks the jointing aggregate in place, ensuring the system is both stable and fully functional. Make multiple passes in different directions.
Ongoing Maintenance:
- Regular Cleaning: Periodically sweep or vacuum the surface to remove leaves, debris, and fine sediment that could potentially clog the joints over time.
- Re-filling Joints: Some joint aggregate may settle or be displaced over time due to weather or traffic. Top up the joints as needed to maintain optimal permeability and structural integrity.
- Addressing Clogging: Should you notice a reduction in the system’s infiltration rate, professional cleaning methods, such as specialised vacuuming or pressure washing techniques, might be required to remove accumulated fines from the aggregate layers.
By meticulously following these detailed steps, you can successfully transform naturally porous natural stone pavers into an integral and effective component of a permeable paving system. This approach not only leverages the inherent beauty and durability of natural stone but also makes a significant contribution to sustainable stormwater management practices in areas like Kew, Victoria, and beyond. While more involved than traditional paving, the environmental benefits of permeable paving systems are substantial.